Showing posts with label Everday Cake. Show all posts

Sunday, July 31, 2011

Sunday Baked: Olive Oil Orange Bundt

We are having a party for my Mom's birthday today, and coincidentally I am scheduled to make Mom's Olive Oil Orange Bundt for my Sunday Morning Baked challenge. How fantastic is that!? I secretly think my family is getting sick of me bringing buttercream-style cakes to ALL our family events, so this cake will be the perfect break in pattern for me. I can't wait to surprise her. Happy Birthday Mom, and thanks for all you do for your crew :)


I always get so excited when I discover fun and interesting little shops offering unique goods and wares. Such was the case with a little place I happened upon in my own town called Twisted Olive. This little gem of a shop specializes in gourmet olive oils and balsamic vinegars, as well as a variety of other goodies for the foodie in you. What is really great about this shop is that you are able to sample all of their offerings before you purchase. It's set up as sort of a wine bar but with large vats of olive oil to siphon from.... who doesn't love free samples especially when you don't have to worry about driving yourself home (as the case with our local wine tasting shop).


After much sampling, I decided on their Meyer Lemon Extra Virgin Olive Oil based on Matt & Renato's recommendation to use a high-quality olive oil with a citrus undertone. What I didn't plan on with my purchase was that 3/4 cups is a lot when using fancy-schmancy olive oil. My $12 olive oil purchase was not quite enough to cover what I needed, and I ended up using olive oil I had on hand to make up the difference.... Whoa, this was turning into one expensive cake!


I quickly got over my olive oil shock as I started zesting the oranges. Their sweet perfume lifted my spirits as it wafted up into the kitchen.... such a rejuvenating smell. In all honesty, I needed that little pick-me-up 'cause I was a feeling bit crankish.


This batter was a bit of a challenge to work with (think thick) until you folded in the whipped egg whites. For me, this is always a test of patience to make sure I don't fold to frantically. Believe me, I have ruined many a cake by folding to hastily. So, take your time, and I always have the best luck folding with the biggest balloon whisk I have! Mine is fairly obnoxious looking, but it does the trick every time (sorry I didn't get a picture of it for you.)


This cake looked beautiful baked! I love seeing vanilla bean seed in my baked goods, and the smell was delightful. It was a perfect way to break in my NEW bundt pan... I know, I can't believe it took me so long to purchase one either.


When all was said and done, this cake was quite tasty. It had a mild citrus taste, but I would have liked a bit more of an 'orange' flavor. Perhaps, I just need to add more orange zest to meet my needs, or maybe the lemon olive oil I selected overpowered the orange flavor of the zest. It also had an interesting 'chewiness' while eating that I can't decide if I liked or not.


Due to the out of pocket expense for this cake (because of the high-quality olive oil), I am not sure I will make this again. However, I still recommend you give it a try. It is a unique cake with good citrus flavor. Oh, and I definitely recommend the citrus glaze :)

Hmmm.... I am very curious to check out how my fellow Baked Sunday Morning bakers fared with this recipe

Have a Sweet Sunday!
Jaime @ The Great Cake Company

Wednesday, July 27, 2011

Daring Bakers: Fresh Fruit Fraisiers

You know those weeks when you just can't seem to get it together? You simply can't catch a break. I know you all do. We all have had them. For me there were no life altering events, just lots of stuff. We're talking sick kids, crazy summer camp schedules and sweltering heat... not to mention pending cake orders and an upcoming road trip to prepare and pack for. I couldn't catch my breath or 10 minutes to myself. I know, complain complain, but seriously, enough already I need to bake!


I had been looking forward to this Daring Bakers challenge with great anticipation all month long. Jana of Cherry Tea Cakes was our July Daring Bakers’ host and she challenged us to make Fresh Fraisiers inspired by recipes written by Elisabeth M. Prueitt and Chad Robertson in the beautiful cookbook Tartine. Fraisiers are one of those desserts I have always admired in the windows of pastry shops, but never dreamed of attempting at home. I was eager for the challenge, and for the notch in my pastry belt.


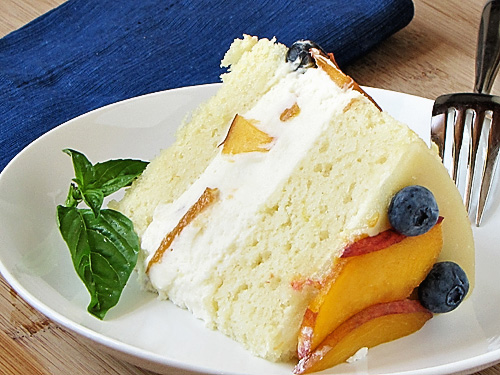
A fraisier is traditionally made with strawberries, however, we were given the option to experiment with our fruit selections. Since the recipe called for an almond paste layer, the most obvious fruit selection to me were peaches, glorious peaches! I love the flavor pairing of peach and almond, and if you add a few blueberries for color, you have yourself a delicious and beautiful fraisier.


Chiffon is such a wonderful, light cake. If you whip up your egg whites properly and fold them in with great care, you are in for a real treat. As a cake decorator, I find chiffon cakes to be an excellent medium to work with. They absorb a simple syrup with ease and compliment a wide variety of fillings and frosting. Another big plus is that they can be served right out of the refrigerator. Since they are made using oil and not butter, there is no need to allow them to come to room temperature since the oil does not firm up in the fridge.


It is essential to have a rock solid pastry cream recipe in your baking repertoire. It is a pastry staple that can be used in anything from banana cream pie, to cake filling to eclairs. This particular recipe calls for fewer eggs than most resulting in a less rich pastry cream. For me, the flavor is wonderful in this cake. It is a delicious compliment to the fresh fruit and lighter than air chiffon cake. It is a keeper in my book, and one that will be used often.


I love almonds in almost every form. However, I recognize that not everyone shares my love of this nut (yes, I know they are not technically nuts). If you are making this for a gathering and you are not sure if you have any almond haters in the bunch, I would suggest omitting the almond paste altogether. Instead, you could spread a layer of fruit preserve or puree, and it would be equally as delicious.


Plain and simple, this was my kind of dessert. I am only moderately ashamed to admit that I could eat this cake in its entirety and for days on end. It is that good. It is light and the flavors work so well together. The best part about this cake though is its versatility. Just about any fruit would work in this recipe. You could also get a little crazy and use a flavored simple syrup or an alternative chiffon cake flavor. The options are plentiful, and I plan to try them all :)

Thanks to Jana of Cherry Tea Cakes and my fellow Daring Bakers for a wonderful challenge.


Happy Baking!
Jaime @ The Great Cake Company
 
FRESH FRUIT FRAISIER  
Recipe adapted from Tartine by Elisabeth M Prueitt and Chad Robertson

FOR THE CAKE 
1 cup plus 2 tablespoons  (5½ oz or155 gm) all-purpose flour
1 teaspoon baking powder
3/4 cups sugar
1/2 teaspoon salt, preferably kosher
1/4 cup vegetable oil
3 large egg yolks
1/3 cup plus 1 tablespoon water
1 teaspoon pure vanilla extract
3/4 teaspoon lemon zest, grated
5 large egg whites, room temperature
1/4 teaspoon cream of tartar

Preheat the oven to moderate 325°F (160°C/gas mark 3). Line the bottom of an 8-inch (20 cm) spring form pan with parchment paper. Do not grease the sides of the pan.

In a large mixing bowl, stir together the flour and baking powder. Add in all but 3 tablespoons (45 ml.) of sugar, and all of the salt. Stir to combine.

In a small bowl combine the oil, egg yolks, water, vanilla and lemon zest. Whisk thoroughly. Combine with the dry ingredients and mix thoroughly for about one minute, or until very smooth.

In a separate bowl, whip your egg whites on medium speed until frothy. Add cream of tartar and continue beating on a medium speed until the whites hold soft peaks. Slowly add the remaining sugar and beat on a medium-high speed until the whites hold firm and form shiny peaks.

Using a grease free rubber spatula, scoop about ⅓ of the whites into the yolk mixture and fold in gently. Gently fold in the remaining whites just until combined.

Pour the batter into the prepared pan. Bake for 45 to 55 minutes or until toothpick inserted into the center comes out clean. Remove the cake from the oven and allow to cool in the pan on a wire rack.

To unmold, run a knife around the sides to loosen the cake from the pan and remove the spring form sides. Invert the cake and peel off the parchment paper. Refrigerate for up to four days in an air tight container. 

FOR THE PASTRY CREAM FILLING
1 cup whole milk
1/2 teaspoon pure vanilla extract
1/8 teaspoon salt, preferably kosher
2 tablespoons cornstarch
1/4 cup sugar
1 large egg
2 tablespoons unsalted butter
3/4 teaspoon (4 gm) gelatin
1/2 tablespoon water
1 cup heavy cream

Pour the milk, vanilla, and salt into a heavy sauce pan. Place over medium-high heat and scald, bringing it to a near boiling point. Stir occasionally.

Meanwhile, in a stand mixer add the cornstarch and sugar. Whisk to combine. Add the eggs to the sugar and cornstarch and whisk until smooth.

When the milk is ready, gently and slowly while the stand mixer is whisking, pour the heated milk down the side of the bowl into the egg mixture.Pour the mixture back into the warm pot and continue to cook over a medium heat until the custard is thick, just about to boil and coats the back of a spoon

Remove from heat and pass through a fine mesh sieve into a large mixing bowl. Allow to cool for ten minutes stirring occasionally. Cut the butter into four pieces and whisk into the pastry cream a piece at a time until smooth

Cover the cream with plastic wrap, pressing the plastic wrap onto the top of the cream to prevent a skin from forming. Chill in the refrigerator for up to five days

In a small dish, sprinkle the gelatin over the water and let stand for a few minutes to soften

Put two inches (55 mm) of water into a small sauce pan and bring to a simmer over a medium heat.
Measure 1/4 cup (2 oz/60 ml) of the chilled pastry cream into a small stainless steel bowl that will sit across the sauce pan with the simmering water, without touching the water.

Heat the cream until it is 120 F (48.8 C). Add the gelatin and whisk until smooth. Remove from the water bath, and whisk the remaining cold pastry cream in to incorporate in two batches.

In a stand mixer, fitted with the whisk attachment, whip the cream until it holds medium-stiff peaks. Immediately fold the whipped cream into the pastry cream with a rubber spatula.

FOR THE SIMPLE SYRUP
1/3 cup of sugar, flavored or white
1/3 cup of water
*optional flavoring (flavored sugars, herbs or spices, 1-2 tsp extract, or up to 4 tablespoons of liqueur or fruit juice)

Combine the water and sugar in a medium saucepan. Bring the mixture to a boil, stirring until the sugar is dissolved. Remove the syrup from the heat and cool slightly. Add any optional flavorings. Transfer syrup to a lidded container or jar that can be stored in the refrigerator. Simple syrup can be stored for up to one month.

ASSEMBLY OF THE FRAISIER 
Line the sides of a 8-inch (20 cm) spring form pan with plastic wrap. Do NOT line the bottom of the pan.

Cut the cake in half horizontally to form two layers. Fit the bottom layer into the prepared spring form pan. Moisten the layer evenly with the simple syrup. When the cake has absorbed enough syrup to resemble a squishy sponge, you have enough.

Wash and slice enough fresh fruit to arrange around the sides of the cake pan. Place the cut side of the fruit against the sides of the pan forming a ring. Pipe cream in between fruit and a thin layer across the top of the cake. Wash and slice your remaining fruit and place them in the middle of the cake. Cover entirely with all but about 1 tablespoon of the pastry cream. Place the second cake layer on top and moisten with the simple syrup.

Lightly dust a work surface with confectioners' sugar and roll out the almond paste to a 10-inch (25 cm) round 1/16 inch (1.5 mm) thick. Trim almond paste to fit top of cake (I used a 7" cake pan as my guide to cut clean circle). Spread the remaining 1 tablespoon (15 ml) of pastry cream on the top of the cake and cover with the round of almond paste. Cover with plastic wrap and refrigerate for at least 4 hours until set.

To serve release the sides of the spring form pan and peel away the plastic wrap. Serve immediately or store in the refrigerator for up to 3 days.

Friday, July 8, 2011

Sour Cherry Crumb Cake


I could kiss you right now Michael Sullivan. I really could. I could give you a big 'ole wet one for planting the beautiful cherry tree in the front yard of your home. The same home that would one day become ours.


I was totally unaware of the gift you left for us until it bore its beautiful red fruit, a most fantastic surprise. Now, for a few weeks each year we are blessed with a bountiful crop of sour cherries. And, what better to do with a bowl full of cherries than make sour cherry crumb cake.  Fooled you! You thought I was going to say pie.


Cherry pie along with a few other family favorites will probably be on the list of things to make this cherry season, but alas, the family demanded crumb cake. So, crumb cake it is.


I need to digress a bit here and apologize for all the cherry photos... I just couldn't resist. They are so darn photogenic. Any which way you position them, they look fantastic. Even my amateur level photography skills were able to get a few decent shots.... everyone should shoot cherries!


Alright, back to the crumb cake. This was top notch delicious! The flavor of the sour cherries is fresh, and not too tart. The cake portion is moist with the perfect texture to support the juicy cherries, and the brown sugar crumb is the cherry on top (pun intended folks)... the perfect sweetness for the tartness of the fruit. In my mind, this is a perfect summer breakfast treat. Heck, it is a perfect anytime treat. I can't wait to make this again. Wonderful!


I do have one note on this recipe. If you take a quick peak at the photo below you will notice that the cake portion is about an inch tall. This is where I kick myself for not taking the extra five minutes to wash my 9x13" pan that was coated with the remains of the previous night's lasagna. Curses! While it was still delicious out of my 8" square pan (with more cake per bite), it really is more suited to be made in a 9x13" pan. This way the cherry/crumb topping ratio is roughly equal to the cake portion. I actually found myself slicing my pieces in half lengthwise to get the perfect bite.


Happy Baking!
Jaime @ The Great Cake Company


SOUR CHERRY CRUMB CAKE
Recipe adapted (with modifications) from Perfect Cake by Nick Malgieri  

Servings: About 24 (2-inch squares)

FOR THE CAKE
1 1/2 cups all-purpose flour (spooned and leveled)
1 teaspoon baking powder
1/4 teaspoon salt
8 tablespoons (1 stick) unsalted butter, room temperature
3/4 sugar
2 large eggs, room temperature
3 tablespoons sour cream
1 teaspoon vanilla extract
1/4 teaspoon almond extract
3 cups fresh sour cherries, pitted (about 1 1/2 pounds)

FOR THE CRUMB TOPPING
1 cup all purpose flour (spooned and leveled)
1/2 cup dark brown sugar, firmly packed
1/2 teaspoon ground cinnamon
1/4 teaspoon fresh ground nutmeg
pinch of kosher salt
8 tablespoons unsalted butter, melted

Preheat the oven to 350-degrees and position the rack in the center of the oven. Butter the sides and bottom of a glass 9x13-inch pan. You can use a metal pan, but the edges of the cake may turn brown and crispy.... this may be tasty option for some.

MAKE THE CRUMB TOPPING
Combine all the ingredients except for the melted butter in a medium sized bowl. Mix to combine. Stir in the melted butter and rub give it a quick stir to incorporate all the ingredients. Use your fingers to rub the sugar mixture together to make course crumbs. Set aside.

MAKE THE CAKE
Combine flour, baking powder and salt in a bowl. Whisk to combine and set aside.

In the bowl of a stand mixer, beat the butter and sugar with the paddle attachment until light and fluffy, about 4 to 5 minutes. Add the eggs one at a time, beating until smooth after each addition. Add the vanilla and almond extracts and beat for another 20 seconds, or until combined. Be sure to scrape down the sides as needed.

Decrease the mixer to its lowest setting and add half of the flour mixture. Mix until incorporated and then add the sour cream. Mix again until well incorporated. Scrape down sides of bowl as needed. Add the remaining flour mixture and mix until well combined.

Scrape batter in the prepared pan and  and level the top with a spatula. Evenly distribute the cherries on top of the batter, but do not press them in. Scatter the crumb topping over the cherries taking care to cover the entire surface evenly.

Bake for 35 to 40 minutes, or until the cake is firm and the crumb topping is nicely browned. Remove from oven and cool on wire rack. Serve warm or at room temperature.

Store at room temperature in an airtight container.

Sunday, April 24, 2011

Sunday Baked: New York Crumb Cake

Happy Easter to everyone! I hope you enjoy your day with family and loved ones. I am going to keep it short and sweet this week, as my kids are pulling on me to open yet another chocolate bunny to devour.... is it even 9 o'clock yet??  

This week's selection for Baked Sunday Mornings was New York-Style Crumb Cake. A perfectly scrumptious addition to our Easter morning breakfast. It was a snap to prepare, and it baked up beautifully. The best part was the heavenly aroma of cinnamon that filled the house. Delicious! A telling sign for me on whether a recipe is a keeper is how quickly it disappears off the table, and lets just say this crumb cake disappeared faster than the Easter Bunny.

Another fun thing about this week's selection was the clarification on the difference between crumb cake and coffee cake. Pay attention here, as this is very important....

Crumb Cake ≠ Coffee Cake

Who knew? I didn't know, and I have a lot of experience with both. I mean a lot. While I was pregnant with my second child I devoured whole (store bought) coffee and crumb cakes in single sittings. I didn't care what the topping or filling was. I would slather butter all over them and whistle happy tunes while they went down the hatch. I think at least 15 coffee and crumb cakes died this way. It was fantastic in a totally awful sort of way.

So, I was a little surprised to learn that New Yorkers are so very protective of their "crumb cake" identity. According to Matt & Renato (a native New Yorker) of Baked Explorations, there are three cardinal rules every New York-Style Crumb Cake must abide by. They are as follows: (1) A New York-Style Crumb Cake must contain boulder-sized clumps of crumb topping almost as thick as the cake itself, (2) A New York-Style Crumb Cake can never contain nuts in any form or fashion, and (3) A New York-Style Crumb Cake cannot contain a swirl of any sort, ever! If you abide by these simple rules, you can bake yourself one heck of a crumb cake, New York-Style.
    If you have a second, hop on over (pun intended) to Baked Explorations to see what my fellow members had to say about this recipe. 

    Happy Easter!

    Sunday, April 17, 2011

    Sunday Baked: Red Velvet Whoopie Pies

    Spring is in the air, my daffodils are blooming and Easter is just around the corner. What better way to get into the mood then with a little egg-shaped, red velvet, whoopie pie fun!

    I am still making up for lost time in my Baked Sunday Morning baking club. As I was flipping through the recipes I have yet to complete, I came across Matt & Renato's Red Velvet Whoopie Pie recipe and thought "hey, these would be fun to make for Easter." So, get your aprons on, and let's get crackin' (no pun intended).

    I feel as though I should confess that up until this point I was a total whoopie pie virgin. I had never eaten a whoopie pie let alone made one. However, I had on occasion imagined myself sitting at a quiet table in Two Fat Cats Bakery in Portland, Main sipping coffee, reading the paper and indulging in one of their famous whoopie pies. In that moment, I could imagine what a whoopie pie should taste like. Ahh.... (big sighs).

    Aside from the fact that I had never consumed a whoopie pie, I feel as though I put a double whammy on this recipe before I even started. Why, you ask? Well, I am just not the biggest red velvet fan. It is sort of a confusing cake for me, and I am not talking about the whole cream cheese vs. Mary Kay frosting or pecans vs. walnuts debate. I am not even going to touch those. For me, it just sort of falls short. It's not quite chocolate, definitely not vanilla, and it has this subtle but unusual acidic kick to it. I know there are many devout fans out there with red velvet running through their veins, but for me, I am still not totally on board.

    Now, I do offer red velvet cake at The Great Cake Company, and I think it is a pretty darn good recipe as far as red velvet goes. It has a little more cocoa powder than your traditional red velvet cakes, and I think using a really good quality cocoa powder can make or brake the recipe. I am fortunate to live about ten minutes from Penzys Spices, a wonderful shop full of some of the best herbs, spices and extracts available. They offer a cocoa powder that works perfectly in my recipe, and I think it worked well in Matt & Renato's too. If you don't have access to Penzys, which I am guessing most of you do not, then try Valrhona or even Ghirardelli.


    In honor of Easter, I had wanted to make pink velvet whoopie pies, but of course I was almost out of pink food coloring. Instead, I used what electric pink gel paste I had left and fuchsia, which gave me an unappealing, purple-ish batter. Thankfully, it didn't matter in the end 'cause they still baked up red.


    Matt & Renato instruct you to place tablespoon sized drops of batter onto a parchment lined cookie sheet. This method works perfectly well for traditionally shaped pies. However, to get these guys into an egg shape for Easter (and to make my life a little easier), I made a template to go under the parchment paper. It was simple. All you need to do is trace an oval shape (I used a cookie cutter) onto a piece of paper. My cookie sheet allowed for six evenly spaced ovals.


    After the ovals are traced, place the parchment paper on top of the template. Fill a pastry bag or Ziploc bag with your batter, and fill the template. It is hard to tell from the photo, but I filled the batter a little thicker at the base of the egg then at the top. This way, if the batter spreads while baking, it will still maintain its egg shape. Make sure to refrigerate the cookie sheet for at least 10 minutes before baking to minimize spreading, and also be sure to remove your template from the cookie sheet before you stick it in the oven and burn the house down... :)


    My pies baked up beautifully in 13 minutes. They were wonderfully moist, and I loved that they had an ever so slight crunch on the outside, but were soft and tender on the inside. They were perfectly executed, but freshly cooled, they seemed to fall into the usual red velvet trap for me. They tasted sort of bland...

    Wait! Don't stone me yet!


    For some reason, I wouldn't give up on these. I sampled the cake a few different times over the next hour, and each time I would mutter to myself, "What is it with red velvet cake? I just don't get it!" ... and then ten minutes later I was back again. By the 6th or 7th time I went back, I started to realize that maybe there was something to these puppies because I simply couldn't stop sampling them. They seemed to be tasting better and better as they sat and as I ate. Almost a quarter of the cakes were gone before I realized I hadn't even slathered any cream cheese on them yet. Hmmmm? What in the world was going on here? Out came some leftover cream cheese icing (my recipe is pretty darn close to theirs so it is not quite cheating), and whoopie was made...pies that is. 


    Let's just conclude this rambling post with this... these were utterly delicious from top to bottom! The red velvet cakes were the perfect compliment (vessel) for the delectable cream cheese filling. I fell in like with red velvet cake today, but I fell in love with whoopie pies. They were a perfect combination and a wonderful Easter treat. I look forward to my next whoopie


    Tuesday, March 29, 2011

    Fat Tuesdays: Lemon Chiffon Cake

    National Lemon Chiffon Cake Day

    According to Punchbowl it is indeed National Lemon Chiffon Cake Day, and for me, a day to celebrate the lighter than air texture and flavor of a delicious, simple chiffon cake. Oh, so yummy!

    The chiffon cake was created by Harry Baker, a Los Angeles insurance agent, in 1927.  Baker carefully guarded his secret technique for almost two decades, only selling his cakes to celebrities and the famous Brown Derby restaurant. The popularity of his cakes grew quickly, and he eventually sold the recipe to General Mills in 1947. All I have to say is thank goodness Mr. Baker finally agreed to play nice and share 'cause life without chiffon cake would be unbearable. Not really, but I wouldn't like as much :)

    Now, I personally didn't develop a fondness for citrus flavored desserts until recent years... terrible right? I just could bring myself to separate my mouth from the chocolate.  It's a shame too because their refreshing quality has a particular draw, and they are appropriate for just about any occasion.

    http://www.nataliedee.com/

    Alright, I know, enough yapping already!  Go! Go gather up all the lemons you can muster. Let's celebrate and make your friends and family happy with lemon chiffon cake!

    When I make citrus desserts that call for zest, I like to rub the zest and sugar together with my fingers until the sugar is moist, grainy and very aromatic. I think this step makes a big difference in the flavor intensity of the end product.


    Now, Mr. Baker had two big secrets with his chiffon cake recipe. The first is that chiffon cakes use oil instead of butter, which aides in the airy quality of the cake. It is also nice because the cake can be refrigerated without firming up. The second secret of the chiffon cake is to whip the egg whites separately from the yolks and to fold them ever so gently into the batter.  If done correctly, the results are divine. If not, you can end up with an ooey-gooey mess in your pans.

    No joking, it took me 10+ attempts before I was able to perfect the whipping and folding technique. The key for me was visually seeing it done and the biggest balloon whisk I could get my hands on. I mean huge :) The video below from the brilliant Rose Levy Beranbaum describes perfectly the process for whipping the perfect egg white.


    Wait, we are not done yet. Here is another excellent example of how to properly fold egg whites into batter. The chef here is making pancake batter, but the same basic concepts apply. You can use a spatula, but I stand by my giant balloon whisk :)


    Not so bad, right!? Once the basic techniques are mastered, you are on your way!


    Lemon Chiffon Cake (Printable Version)
    Adapted (with changes) from The Cake Bible by Rose Levy Beranbaum

    Rose's recipe as written is excellent, however, I did make a few changes to suit my personal tastes. I upped the sugar by 2 tablespoons, the lemon zest by 1 tablespoon and the vanilla extract by 1/2 teaspoon. I also used canola oil in place of safflower oil.

    Ingredients:
    2 1/4 cups (8 ounces) cake flour
    1 1/2 cups plus 2 Tbs granulated sugar
    2  Tbs lemon zest
    1/2 tsp baking soda
    1/2 tsp salt
    1/2 cup canola oil
    7 large eggs separated, room temperature
    3 large egg whites, room temperature
    2/3 cup water
    2 Tbs lemon juice
    1 1/2 tsp pure vanilla extract
    1 1/4 tsp cream of tartar

    Preheat your oven to 325 degrees.  Grab your 10-inch tube pan with a detachable bottom, but do not grease it as the batter needs to climb up the sides :)

    In a large mixing bowl, combine 1 1/2 cups of the sugar and the lemon zest. With your fingertips, work the zest and sugar together until the sugar is grainy and very aromatic.  Add the cake flour, baking soda and salt to the bowl.  If using a stand mixer, use the beater attachment and beat on low until the ingredients are well incorporated. You can also do this by hand with a whisk. Once incorporated, make a well in the center of your mixing bowl.  Add the oil, egg yolks, water, lemon juice and vanilla to the well. Mix for about 1 more minute on medium speed until the batter is smooth and there are no lumps. 

    In a second large mixing bowl, beat the egg whites until they are foamy.  Add the cream of tartar and continue to beat on medium speed until they reach soft peak stage. You will know your egg whites have reached this stage when the beaters start to leave a trail or when the peaks fall over when the beaters are raised. Add the remaining 2 Tbs of sugar, and continue to beat the egg whites until they form stiff peaks when the beaters are raised.

    Using a large spatula or whisk, add 1/3 of your egg whites to your cake batter and gently stir them until they are incorporated. Add the remaining egg whites to the batter and very gently fold them into the batter until they are incorporated and no traces of egg whites remain.  

    Pour the batter into the pan and bake for 50 to 55 minutes or until the cake bounces back when lightly pressed in the center.  You can try the 'ole toothpick test, but it can be tricky since you can't get all the way into the center. Mine baked in 50 minutes to perfection. Remove the pan from the oven and immediately invert it onto a wine bottle (or something similar) to allow for proper cooling, which can take up to 90 minutes.

    Serve this heavenly cake with a dusting of powdered sugar or drizzled with your favorite glaze.  Either way, enjoy and Happy Lemon Chiffon Cake Day!