Showing posts with label Daring Bakers. Show all posts
Friday, January 27, 2012
Daring Bakers: Biscuits
Wow! I have been a very bad blogger lately. I just realized it's been well over a month since I last posted. I guess I have either been too tired to bake and write or involved with too many other projects to stop in and say hello. And, while I sort of enjoyed the break, I promise to try to get back on track.
Labels:
Bread,
Breakfast,
Daring Bakers
Thursday, October 27, 2011
Daring Bakers: Povitica
Povitica, pronounced po-va-teet-sa, is a popular holiday dessert bread, much like a nut roll, served in Eastern Europe. Depending on what country you are in, the name and filling will vary; however, they all share the common thread of tradition and familial pride. Secret family recipes and techniques have been passed down through generations. Epic battles have been waged over proper rolling techniques (okay, not really). How have I never heard of this sweet and swirly bread?
Labels:
Bread,
Daring Bakers,
Holiday,
Nuts
Tuesday, September 27, 2011
Daring Bakers: Croissants
The Daring Bakers go retro this month! Thanks to one of our very talented non-blogging members, Sarah, the Daring Bakers were challenged to make Croissants using a recipe from the Queen of French Cooking, none other than Julia Child!
This is not only my first Julia Child recipe, but also my first time making croissants. Yes, before this week I was a croissant-making virgin.
.... Err, I don't think that one came out right :)
Any who, I need to apologize to all of you for the quality of my post this week. I had no idea croissants would be such a devil to make! Not because it was overly difficult (though technique is required for sure), but rather they took forever to complete. I am talking a good day and a half when all was said and done. Granted, I could have knocked a lot of the time off the clock had I not had a million things going on, but it never happens that way. Instead, I had to squeeze steps in here and there throughout the weekend. As a result, I was not able to get many of the photos I had hoped to for all of the required steps. Sorry all!
Labels:
Breakfast,
Croissants,
Daring Bakers,
Dough
Saturday, August 27, 2011
Daring Bakers:
Passion Fruit Gelées with Lime Sugar
So, here it goes... And it isn't pretty this month.
The August 2011 Daring Bakers’ Challenge was hosted by Lisa of Parsley, Sage, Desserts and Line Drive and Mandy of What the Fruitcake?!. These two sugar mavens challenged us to make sinfully delicious candies! This was a special challenge for the Daring Bakers because the good folks at http://www.chocoley.com offered an amazing prize for the winner of the most creative and delicious candy
Errrrrrrrrr... Say what? I messed up already?
Darn it!
Not the recipe... No, actually these little gems are quite refreshing. I am talking about this whole "Candylicious" themed month here at The Daring Kitchen. Yes, I read through the instructions at the beginning of the month and thought I understood the challenge, but as I am about to post, I am realizing I messed this one up. I messed it up pretty good.
Now, from what I thought I had read, I didn't have to make a chocolate candy if I did not want to enter the contest. To be honest, with school starting, a son with a broken leg, and a whole bunch of other craziness, the last thing I wanted to do was think about a creative chocolate recipe. (Thanks to those who did 'cause I will be trying them out later.) No, I needed a no brainer this month. A simple recipe where I could just stick to the script.
Well, as it runs out, I did need to make a chocolate recipe AND a non-chocolate recipe...
Says so right here... See?
I am not sure how the requirements could have been made more clear. And, to top it off, I went out and found my own non-chocolate recipe.
I am fairly certain finiding my own recipe isn't allowed either. What in the world was I thinking? Wow! Was I off on this one, or what?!
FOR THE LIME SUGAR
2 small limes
1 cup of sugar
Method
Using a microplane, zest limes and add to sugar. Mix the zest with the sugar until well combined and store in an airtight container. Zest should be ready in about 5 to 7 days. If you find the citrus flavor is not strong enough after 1 week, add a little fresh zest to the sugar before using.
-------------------------------
FOR THE PASSION FRUIT GELÉES
Recipe adapted from Gourmet (December 2007)
4 (1/4 ounce) packages unflavored gelatin
1 cup water
2 cups sugar plus additional for tossing
1 teaspoon fresh lemon juice
3/4 cup thawed unsweetened passion fruit puree (maracuya) such as Goya brand
Method
Lightly oil an 8-inch square, nonstick baking pan.
Sprinkle gelatin over water in a 2-quart heavy saucepan and let stand 4 minutes to soften. Heat gelatin over medium-low heat, stirring until dissolved. Add 2 cups sugar and stir until dissolved. Add lemon juice and stir.
Bring to a boil over medium-high heat, washing any sugar crystals down side of pan with a pastry brush dipped in cold water. Reduce heat to medium-low and boil, uncovered, without stirring, 13 minutes (watch carefully so that mixture does not boil over). Remove from heat and let stand 5 minutes for bubbles to dissipate. (Skim any foam that remains after 5 minutes.) Stir in passion-fruit purée (do not scrape bottom of pan; leave any dark bits that stick).
Pour into baking pan and pop any remaining bubbles with a toothpick. Let stand at room temperature until set, at least 12 hours.
Run a sharp knife around edge of gelatin and invert onto a cutting board. If the gelées will not release from the pan, place a hot towel on the bottom of the pan until they release. Cut into 1/2-inch-wide strips, then cut strips into 1-inch pieces. Just before serving, gently toss gelées in a bowl of (lime) sugar to coat, brushing off excess.
Gelées, without the sugar coating, will keep in an airtight container at room temperature for two weeks.
The August 2011 Daring Bakers’ Challenge was hosted by Lisa of Parsley, Sage, Desserts and Line Drive and Mandy of What the Fruitcake?!. These two sugar mavens challenged us to make sinfully delicious candies! This was a special challenge for the Daring Bakers because the good folks at http://www.chocoley.com offered an amazing prize for the winner of the most creative and delicious candy
Errrrrrrrrr... Say what? I messed up already?
Darn it!
Not the recipe... No, actually these little gems are quite refreshing. I am talking about this whole "Candylicious" themed month here at The Daring Kitchen. Yes, I read through the instructions at the beginning of the month and thought I understood the challenge, but as I am about to post, I am realizing I messed this one up. I messed it up pretty good.
Now, from what I thought I had read, I didn't have to make a chocolate candy if I did not want to enter the contest. To be honest, with school starting, a son with a broken leg, and a whole bunch of other craziness, the last thing I wanted to do was think about a creative chocolate recipe. (Thanks to those who did 'cause I will be trying them out later.) No, I needed a no brainer this month. A simple recipe where I could just stick to the script.
Well, as it runs out, I did need to make a chocolate recipe AND a non-chocolate recipe...
Says so right here... See?
MANDATORY ITEMS
You must make TWO candies
The first candy must be ONE of the following CHOCOLATE candies:
a. A truffle, dipped or not dipped in chocolate OR
b. A cut (square) dipped chocolate/bonbon OR
c. A filled chocolate/bonbon using a chocolate mold
b. A cut (square) dipped chocolate/bonbon OR
c. A filled chocolate/bonbon using a chocolate mold
The other candy can be any CHOCOLATE or NON-CHOCOLATE candy you like.
I am not sure how the requirements could have been made more clear. And, to top it off, I went out and found my own non-chocolate recipe.
GULP!
I am fairly certain finiding my own recipe isn't allowed either. What in the world was I thinking? Wow! Was I off on this one, or what?!
Since I am realizing my mistake a few hours before post time, instead of a Daring Bakers compliant post, you get these candies made of passion fruit puree and lime infused sugar. They were a bit reminiscent of Jell-O Jigglers but with more sophistication. The original recipe called for plain sugar to coat, but I chose to jazz them up with the lime sugar, which added a definite kick. To be honest though, out of the three options (no sugar, plain sugar and lime sugar), I thought the unadorned gelées were the best.
Hopefully, next month will prove less of an embarrassment. I can't promise though :)
Have a Sweet Day!
Jaime @ The Great Cake Company
PASSION FRUIT GELÉES with LIME SUGAR
Makes about 4 dozen candies Start to Finish: 13 hr (includes setting time)
-------------------------------
FOR THE LIME SUGAR
2 small limes
1 cup of sugar
Method
Using a microplane, zest limes and add to sugar. Mix the zest with the sugar until well combined and store in an airtight container. Zest should be ready in about 5 to 7 days. If you find the citrus flavor is not strong enough after 1 week, add a little fresh zest to the sugar before using.
-------------------------------
FOR THE PASSION FRUIT GELÉES
Recipe adapted from Gourmet (December 2007)
4 (1/4 ounce) packages unflavored gelatin
1 cup water
2 cups sugar plus additional for tossing
1 teaspoon fresh lemon juice
3/4 cup thawed unsweetened passion fruit puree (maracuya) such as Goya brand
Method
Lightly oil an 8-inch square, nonstick baking pan.
Sprinkle gelatin over water in a 2-quart heavy saucepan and let stand 4 minutes to soften. Heat gelatin over medium-low heat, stirring until dissolved. Add 2 cups sugar and stir until dissolved. Add lemon juice and stir.
Bring to a boil over medium-high heat, washing any sugar crystals down side of pan with a pastry brush dipped in cold water. Reduce heat to medium-low and boil, uncovered, without stirring, 13 minutes (watch carefully so that mixture does not boil over). Remove from heat and let stand 5 minutes for bubbles to dissipate. (Skim any foam that remains after 5 minutes.) Stir in passion-fruit purée (do not scrape bottom of pan; leave any dark bits that stick).
Pour into baking pan and pop any remaining bubbles with a toothpick. Let stand at room temperature until set, at least 12 hours.
Run a sharp knife around edge of gelatin and invert onto a cutting board. If the gelées will not release from the pan, place a hot towel on the bottom of the pan until they release. Cut into 1/2-inch-wide strips, then cut strips into 1-inch pieces. Just before serving, gently toss gelées in a bowl of (lime) sugar to coat, brushing off excess.
Gelées, without the sugar coating, will keep in an airtight container at room temperature for two weeks.
Labels:
Candy,
Daring Bakers,
Fruit,
Lime,
Passion Fruit
Wednesday, July 27, 2011
Daring Bakers: Fresh Fruit Fraisiers
You know those weeks when you just can't seem to get it together? You simply can't catch a break. I know you all do. We all have had them. For me there were no life altering events, just lots of stuff. We're talking sick kids, crazy summer camp schedules and sweltering heat... not to mention pending cake orders and an upcoming road trip to prepare and pack for. I couldn't catch my breath or 10 minutes to myself. I know, complain complain, but seriously, enough already I need to bake!
I had been looking forward to this Daring Bakers challenge with great anticipation all month long. Jana of Cherry Tea Cakes was our July Daring Bakers’ host and she challenged us to make Fresh Fraisiers inspired by recipes written by Elisabeth M. Prueitt and Chad Robertson in the beautiful cookbook Tartine. Fraisiers are one of those desserts I have always admired in the windows of pastry shops, but never dreamed of attempting at home. I was eager for the challenge, and for the notch in my pastry belt.
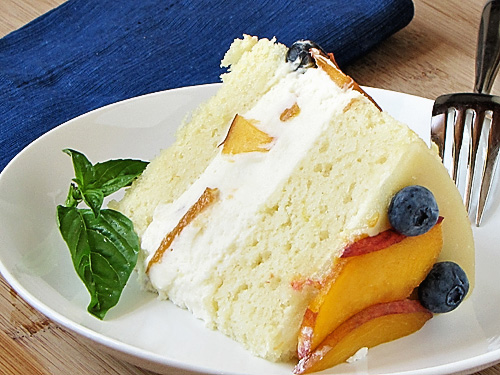
A fraisier is traditionally made with strawberries, however, we were given the option to experiment with our fruit selections. Since the recipe called for an almond paste layer, the most obvious fruit selection to me were peaches, glorious peaches! I love the flavor pairing of peach and almond, and if you add a few blueberries for color, you have yourself a delicious and beautiful fraisier.
It is essential to have a rock solid pastry cream recipe in your baking repertoire. It is a pastry staple that can be used in anything from banana cream pie, to cake filling to eclairs. This particular recipe calls for fewer eggs than most resulting in a less rich pastry cream. For me, the flavor is wonderful in this cake. It is a delicious compliment to the fresh fruit and lighter than air chiffon cake. It is a keeper in my book, and one that will be used often.
I love almonds in almost every form. However, I recognize that not everyone shares my love of this nut (yes, I know they are not technically nuts). If you are making this for a gathering and you are not sure if you have any almond haters in the bunch, I would suggest omitting the almond paste altogether. Instead, you could spread a layer of fruit preserve or puree, and it would be equally as delicious.
Plain and simple, this was my kind of dessert. I am only moderately ashamed to admit that I could eat this cake in its entirety and for days on end. It is that good. It is light and the flavors work so well together. The best part about this cake though is its versatility. Just about any fruit would work in this recipe. You could also get a little crazy and use a flavored simple syrup or an alternative chiffon cake flavor. The options are plentiful, and I plan to try them all :)
Thanks to Jana of Cherry Tea Cakes and my fellow Daring Bakers for a wonderful challenge.
FOR THE CAKE
Preheat the oven to moderate 325°F (160°C/gas mark 3). Line the bottom of an 8-inch (20 cm) spring form pan with parchment paper. Do not grease the sides of the pan.
In a large mixing bowl, stir together the flour and baking powder. Add in all but 3 tablespoons (45 ml.) of sugar, and all of the salt. Stir to combine.
In a small bowl combine the oil, egg yolks, water, vanilla and lemon zest. Whisk thoroughly. Combine with the dry ingredients and mix thoroughly for about one minute, or until very smooth.
In a separate bowl, whip your egg whites on medium speed until frothy. Add cream of tartar and continue beating on a medium speed until the whites hold soft peaks. Slowly add the remaining sugar and beat on a medium-high speed until the whites hold firm and form shiny peaks.
Using a grease free rubber spatula, scoop about ⅓ of the whites into the yolk mixture and fold in gently. Gently fold in the remaining whites just until combined.
Pour the batter into the prepared pan. Bake for 45 to 55 minutes or until toothpick inserted into the center comes out clean. Remove the cake from the oven and allow to cool in the pan on a wire rack.
To unmold, run a knife around the sides to loosen the cake from the pan and remove the spring form sides. Invert the cake and peel off the parchment paper. Refrigerate for up to four days in an air tight container.
FOR THE PASTRY CREAM FILLING
1 cup whole milk
1/2 teaspoon pure vanilla extract
1/8 teaspoon salt, preferably kosher
2 tablespoons cornstarch
1/4 cup sugar
1 large egg
2 tablespoons unsalted butter
3/4 teaspoon (4 gm) gelatin
1/2 tablespoon water
1 cup heavy cream
Pour the milk, vanilla, and salt into a heavy sauce pan. Place over medium-high heat and scald, bringing it to a near boiling point. Stir occasionally.
Meanwhile, in a stand mixer add the cornstarch and sugar. Whisk to combine. Add the eggs to the sugar and cornstarch and whisk until smooth.
When the milk is ready, gently and slowly while the stand mixer is whisking, pour the heated milk down the side of the bowl into the egg mixture.Pour the mixture back into the warm pot and continue to cook over a medium heat until the custard is thick, just about to boil and coats the back of a spoon
Remove from heat and pass through a fine mesh sieve into a large mixing bowl. Allow to cool for ten minutes stirring occasionally. Cut the butter into four pieces and whisk into the pastry cream a piece at a time until smooth
Cover the cream with plastic wrap, pressing the plastic wrap onto the top of the cream to prevent a skin from forming. Chill in the refrigerator for up to five days
In a small dish, sprinkle the gelatin over the water and let stand for a few minutes to soften
Put two inches (55 mm) of water into a small sauce pan and bring to a simmer over a medium heat.
Measure 1/4 cup (2 oz/60 ml) of the chilled pastry cream into a small stainless steel bowl that will sit across the sauce pan with the simmering water, without touching the water.
Heat the cream until it is 120 F (48.8 C). Add the gelatin and whisk until smooth. Remove from the water bath, and whisk the remaining cold pastry cream in to incorporate in two batches.
In a stand mixer, fitted with the whisk attachment, whip the cream until it holds medium-stiff peaks. Immediately fold the whipped cream into the pastry cream with a rubber spatula.
1/3 cup of water
*optional flavoring (flavored sugars, herbs or spices, 1-2 tsp extract, or up to 4 tablespoons of liqueur or fruit juice)
Combine the water and sugar in a medium saucepan. Bring the mixture to a boil, stirring until the sugar is dissolved. Remove the syrup from the heat and cool slightly. Add any optional flavorings. Transfer syrup to a lidded container or jar that can be stored in the refrigerator. Simple syrup can be stored for up to one month.
Cut the cake in half horizontally to form two layers. Fit the bottom layer into the prepared spring form pan. Moisten the layer evenly with the simple syrup. When the cake has absorbed enough syrup to resemble a squishy sponge, you have enough.
Wash and slice enough fresh fruit to arrange around the sides of the cake pan. Place the cut side of the fruit against the sides of the pan forming a ring. Pipe cream in between fruit and a thin layer across the top of the cake. Wash and slice your remaining fruit and place them in the middle of the cake. Cover entirely with all but about 1 tablespoon of the pastry cream. Place the second cake layer on top and moisten with the simple syrup.
Lightly dust a work surface with confectioners' sugar and roll out the almond paste to a 10-inch (25 cm) round 1/16 inch (1.5 mm) thick. Trim almond paste to fit top of cake (I used a 7" cake pan as my guide to cut clean circle). Spread the remaining 1 tablespoon (15 ml) of pastry cream on the top of the cake and cover with the round of almond paste. Cover with plastic wrap and refrigerate for at least 4 hours until set.
To serve release the sides of the spring form pan and peel away the plastic wrap. Serve immediately or store in the refrigerator for up to 3 days.
I had been looking forward to this Daring Bakers challenge with great anticipation all month long. Jana of Cherry Tea Cakes was our July Daring Bakers’ host and she challenged us to make Fresh Fraisiers inspired by recipes written by Elisabeth M. Prueitt and Chad Robertson in the beautiful cookbook Tartine. Fraisiers are one of those desserts I have always admired in the windows of pastry shops, but never dreamed of attempting at home. I was eager for the challenge, and for the notch in my pastry belt.
A fraisier is traditionally made with strawberries, however, we were given the option to experiment with our fruit selections. Since the recipe called for an almond paste layer, the most obvious fruit selection to me were peaches, glorious peaches! I love the flavor pairing of peach and almond, and if you add a few blueberries for color, you have yourself a delicious and beautiful fraisier.
Chiffon is such a wonderful, light cake. If you whip up your egg whites properly and fold them in with great care, you are in for a real treat. As a cake decorator, I find chiffon cakes to be an excellent medium to work with. They absorb a simple syrup with ease and compliment a wide variety of fillings and frosting. Another big plus is that they can be served right out of the refrigerator. Since they are made using oil and not butter, there is no need to allow them to come to room temperature since the oil does not firm up in the fridge.
It is essential to have a rock solid pastry cream recipe in your baking repertoire. It is a pastry staple that can be used in anything from banana cream pie, to cake filling to eclairs. This particular recipe calls for fewer eggs than most resulting in a less rich pastry cream. For me, the flavor is wonderful in this cake. It is a delicious compliment to the fresh fruit and lighter than air chiffon cake. It is a keeper in my book, and one that will be used often.
I love almonds in almost every form. However, I recognize that not everyone shares my love of this nut (yes, I know they are not technically nuts). If you are making this for a gathering and you are not sure if you have any almond haters in the bunch, I would suggest omitting the almond paste altogether. Instead, you could spread a layer of fruit preserve or puree, and it would be equally as delicious.
Plain and simple, this was my kind of dessert. I am only moderately ashamed to admit that I could eat this cake in its entirety and for days on end. It is that good. It is light and the flavors work so well together. The best part about this cake though is its versatility. Just about any fruit would work in this recipe. You could also get a little crazy and use a flavored simple syrup or an alternative chiffon cake flavor. The options are plentiful, and I plan to try them all :)
Thanks to Jana of Cherry Tea Cakes and my fellow Daring Bakers for a wonderful challenge.
Happy Baking!
Jaime @ The Great Cake Company
FRESH FRUIT FRAISIER
Recipe adapted from Tartine by Elisabeth M Prueitt and Chad Robertson
FOR THE CAKE
1 cup plus 2 tablespoons (5½ oz or155 gm) all-purpose flour
1 teaspoon baking powder
3/4 cups sugar
1/2 teaspoon salt, preferably kosher
1/4 cup vegetable oil
3 large egg yolks
1/3 cup plus 1 tablespoon water
1 teaspoon pure vanilla extract
3/4 teaspoon lemon zest, grated
5 large egg whites, room temperature
1/4 teaspoon cream of tartar
Preheat the oven to moderate 325°F (160°C/gas mark 3). Line the bottom of an 8-inch (20 cm) spring form pan with parchment paper. Do not grease the sides of the pan.
In a large mixing bowl, stir together the flour and baking powder. Add in all but 3 tablespoons (45 ml.) of sugar, and all of the salt. Stir to combine.
In a small bowl combine the oil, egg yolks, water, vanilla and lemon zest. Whisk thoroughly. Combine with the dry ingredients and mix thoroughly for about one minute, or until very smooth.
In a separate bowl, whip your egg whites on medium speed until frothy. Add cream of tartar and continue beating on a medium speed until the whites hold soft peaks. Slowly add the remaining sugar and beat on a medium-high speed until the whites hold firm and form shiny peaks.
Using a grease free rubber spatula, scoop about ⅓ of the whites into the yolk mixture and fold in gently. Gently fold in the remaining whites just until combined.
Pour the batter into the prepared pan. Bake for 45 to 55 minutes or until toothpick inserted into the center comes out clean. Remove the cake from the oven and allow to cool in the pan on a wire rack.
To unmold, run a knife around the sides to loosen the cake from the pan and remove the spring form sides. Invert the cake and peel off the parchment paper. Refrigerate for up to four days in an air tight container.
FOR THE PASTRY CREAM FILLING
1 cup whole milk
1/2 teaspoon pure vanilla extract
1/8 teaspoon salt, preferably kosher
2 tablespoons cornstarch
1/4 cup sugar
1 large egg
2 tablespoons unsalted butter
3/4 teaspoon (4 gm) gelatin
1/2 tablespoon water
1 cup heavy cream
Pour the milk, vanilla, and salt into a heavy sauce pan. Place over medium-high heat and scald, bringing it to a near boiling point. Stir occasionally.
Meanwhile, in a stand mixer add the cornstarch and sugar. Whisk to combine. Add the eggs to the sugar and cornstarch and whisk until smooth.
When the milk is ready, gently and slowly while the stand mixer is whisking, pour the heated milk down the side of the bowl into the egg mixture.Pour the mixture back into the warm pot and continue to cook over a medium heat until the custard is thick, just about to boil and coats the back of a spoon
Remove from heat and pass through a fine mesh sieve into a large mixing bowl. Allow to cool for ten minutes stirring occasionally. Cut the butter into four pieces and whisk into the pastry cream a piece at a time until smooth
Cover the cream with plastic wrap, pressing the plastic wrap onto the top of the cream to prevent a skin from forming. Chill in the refrigerator for up to five days
In a small dish, sprinkle the gelatin over the water and let stand for a few minutes to soften
Put two inches (55 mm) of water into a small sauce pan and bring to a simmer over a medium heat.
Measure 1/4 cup (2 oz/60 ml) of the chilled pastry cream into a small stainless steel bowl that will sit across the sauce pan with the simmering water, without touching the water.
Heat the cream until it is 120 F (48.8 C). Add the gelatin and whisk until smooth. Remove from the water bath, and whisk the remaining cold pastry cream in to incorporate in two batches.
In a stand mixer, fitted with the whisk attachment, whip the cream until it holds medium-stiff peaks. Immediately fold the whipped cream into the pastry cream with a rubber spatula.
FOR THE SIMPLE SYRUP
1/3 cup of sugar, flavored or white1/3 cup of water
*optional flavoring (flavored sugars, herbs or spices, 1-2 tsp extract, or up to 4 tablespoons of liqueur or fruit juice)
Combine the water and sugar in a medium saucepan. Bring the mixture to a boil, stirring until the sugar is dissolved. Remove the syrup from the heat and cool slightly. Add any optional flavorings. Transfer syrup to a lidded container or jar that can be stored in the refrigerator. Simple syrup can be stored for up to one month.
ASSEMBLY OF THE FRAISIER
Line the sides of a 8-inch (20 cm) spring form pan with plastic wrap. Do NOT line the bottom of the pan.Cut the cake in half horizontally to form two layers. Fit the bottom layer into the prepared spring form pan. Moisten the layer evenly with the simple syrup. When the cake has absorbed enough syrup to resemble a squishy sponge, you have enough.
Wash and slice enough fresh fruit to arrange around the sides of the cake pan. Place the cut side of the fruit against the sides of the pan forming a ring. Pipe cream in between fruit and a thin layer across the top of the cake. Wash and slice your remaining fruit and place them in the middle of the cake. Cover entirely with all but about 1 tablespoon of the pastry cream. Place the second cake layer on top and moisten with the simple syrup.
Lightly dust a work surface with confectioners' sugar and roll out the almond paste to a 10-inch (25 cm) round 1/16 inch (1.5 mm) thick. Trim almond paste to fit top of cake (I used a 7" cake pan as my guide to cut clean circle). Spread the remaining 1 tablespoon (15 ml) of pastry cream on the top of the cake and cover with the round of almond paste. Cover with plastic wrap and refrigerate for at least 4 hours until set.
To serve release the sides of the spring form pan and peel away the plastic wrap. Serve immediately or store in the refrigerator for up to 3 days.
Labels:
Almonds,
Blueberry,
Cake,
Chiffon,
Daring Bakers,
Everday Cake,
Fruit,
Peaches
Monday, June 27, 2011
Daring Bakers: Baklava
Holy Baklava Batman!
Erica of Erica’s Edibles was our host for the Daring Baker’s June challenge. Erica challenged us to be truly DARING by making homemade phyllo dough and then to use that homemade dough to make Baklava. Yes, you read that correctly folks... h-o-m-e-m-a-d-e phyllo dough.
Baklava is not in my usual rotation of desserts. I vaguely remember trying it once on a Jr. High field trip to Chicago's Greektown, and from what I remember, it was pretty good (of course, my favorite desserts at that time were Hostess Ding Dongs and Suzy-Q, so it goes to show you how discerning my palette was back then).
I also remembered the two packages of phyllo sitting in my freezer just waiting to be put to good use. But no, Erica had to go all 'daring' on us and insist on h-o-m-e-m-a-d-e phyllo (just teasing, I love this challenge). I guess they will have to wait for another day.
Labels:
Almonds,
Daring Bakers,
Honey,
Nuts,
Phyllo,
Pistachios,
Puff Pastry
Friday, May 27, 2011
Daring Bakers: Chocolate Marquise
The May 2011 Daring Bakers’ challenge was hosted by Emma of CookCraftGrow and Jenny of Purple House Dirt. They chose to challenge everyone to make a Chocolate Marquise. The inspiration for this recipe comes from a dessert they prepared at a restaurant in Seattle.
This was my first Daring Bakers challenge, and whoa, they weren't kidding about the challenges being daring. An overly adventurous baker I am not (at least not yet). So, this dessert proved to be quite a feat for me! What the heck is a Chocolate Marquise anyway?! Well, I can tell you this... the dessert has French roots, it was a bit of a stretch for my budding pastry skills, and it was pretty darn time consuming. At least the end result was rather enjoyable :)
There were five components to this dessert including: a tequila and cayenne pepper flavored chocolate base for the marquise, the completed frozen marquise, cayenne toasted almonds, torched meringue and an irresistible salted caramel sauce... Wait a sec...let me catch my breath.... whew, what a list! All the elements weren't overly difficult to make if you know the basics behind making caramel, ganache and meringue. It was actually more of a challenge of timing and patience to pull this one off.
The Marquise itself was unusual and quite wonderful. It had a lovely silky texture that melted on your tongue, and the caramel..... mmmmm! So good! The meringue and toasted almonds did not blow me out of the water, and I probably could have done without them from a taste perspective, but they did make for a pretty plate.
Will I make this again? Nope, too much work! But, it really was a nice treat and a cool thing to be able to say I made. I am very eager to see what next month brings...
Happy baking!
Jaime @ The Great Cake Company
Hint: Make in the order listed below
1/8 teaspoon salt
1/16 teaspoon cayenne
1 tablespoon (15 ml/ 1/2 fluid oz.) tequila
1 tablespoon (15 ml/ 1/2 fluid oz.) light corn syrup
1/4 teaspoon vanilla
1 tablespoon/(less than 1/4 ounce) Dutch Processed cocoa powder
dash freshly ground black pepper
1/2 tablespoon (8 grams) softened
Tequila Caramel
Meringue
This was my first Daring Bakers challenge, and whoa, they weren't kidding about the challenges being daring. An overly adventurous baker I am not (at least not yet). So, this dessert proved to be quite a feat for me! What the heck is a Chocolate Marquise anyway?! Well, I can tell you this... the dessert has French roots, it was a bit of a stretch for my budding pastry skills, and it was pretty darn time consuming. At least the end result was rather enjoyable :)
There were five components to this dessert including: a tequila and cayenne pepper flavored chocolate base for the marquise, the completed frozen marquise, cayenne toasted almonds, torched meringue and an irresistible salted caramel sauce... Wait a sec...let me catch my breath.... whew, what a list! All the elements weren't overly difficult to make if you know the basics behind making caramel, ganache and meringue. It was actually more of a challenge of timing and patience to pull this one off.
The Marquise itself was unusual and quite wonderful. It had a lovely silky texture that melted on your tongue, and the caramel..... mmmmm! So good! The meringue and toasted almonds did not blow me out of the water, and I probably could have done without them from a taste perspective, but they did make for a pretty plate.
Will I make this again? Nope, too much work! But, it really was a nice treat and a cool thing to be able to say I made. I am very eager to see what next month brings...
Happy baking!
Jaime @ The Great Cake Company
Chocolate Marquise
Servings: 9 - 2"x2" cubesHint: Make in the order listed below
Chocolate Base (for completed Marquise)
3 oz (85 grams/ 6 tablespoons) bittersweet chocolate (about 70% cocoa)
1/3 cup + 2 teaspoons (90 ml/3 fluid oz.) heavy cream1/8 teaspoon salt
1/16 teaspoon cayenne
1 tablespoon (15 ml/ 1/2 fluid oz.) tequila
1 tablespoon (15 ml/ 1/2 fluid oz.) light corn syrup
1/4 teaspoon vanilla
1 tablespoon/(less than 1/4 ounce) Dutch Processed cocoa powder
dash freshly ground black pepper
1/2 tablespoon (8 grams) softened
Completed Marquise
3 large egg yolks at room temperature
1 large egg
2 tablespoons + 2 teaspoons (40 ml) (40 grams/ 1½ oz) sugar
1 tablespoon + 1 teaspoon (2/3 fluid oz/ 20 ml.) water
Chocolate Base, barely warm (recipe above)
½ cup (4 fluid oz./ 120 ml.) heavy cream
½ cup Dutch process cocoa powder (for rolling)
In the bowl of a stand mixer, combine the egg yolks and whole eggs. With your whisk attachment, whip on high speed until very thick and pale, about 10 minutes.
When the eggs are getting close to finishing, make a sugar syrup by combining the sugar and water in a small saucepan. Bring the syrup to a boil and then cook to softball stage (235F/115C). Remove the pan from the heat and immediately drizzle the sugar syrup into the fluffy eggs (while the mixer running on low speed), trying to hit that magic spot between the mixing bowl and the whisk. When all of the syrup has been added (do it fairly quickly), turn the mixer back on high and whip until the bowl is cool to the touch. This will take at least 5 minutes.
When the egg mixture has cooled, add the chocolate base to the egg mixture and whisk to combine. Try to get it as consistent as possible without losing all of the air you've whipped into the eggs. Fold 1/3 of the reserved whipped cream into the chocolate mixture to loosen it, and then fold in the remaining whipped cream.
Toasted Almonds
1/4 cup (2 oz.) sugar
1/2 teaspoon cinnamon
1/8 teaspoon cayenne
1/4 teaspoon salt
1/2 large egg whites
1/2 cup blanched whole almonds
Preheat the oven to 350F. Line a sheet pan with aluminum foil.
1 large egg
2 tablespoons + 2 teaspoons (40 ml) (40 grams/ 1½ oz) sugar
1 tablespoon + 1 teaspoon (2/3 fluid oz/ 20 ml.) water
Chocolate Base, barely warm (recipe above)
½ cup (4 fluid oz./ 120 ml.) heavy cream
½ cup Dutch process cocoa powder (for rolling)
Line a 6" square baking ban with parchment paper. Be sure to leave a little extra on either side for easy removal of the Marquise from the pan.
Begin by making the chocolate base. Place the chocolate in a small mixing bowl. Pour the heavy cream in a microwave safe bowl and warm it in the microwave until the cream is hot to the touch (but is not boiling). Remove it from the microwave and pour over the chocolate. Allow the heavy cream to sit for a minute or two before stirring. Stir until the chocolate is melted completely and is smooth throughout. Add the remaining ingredients and stir to combine.
Set aside the chocolate until cooled to room temperature. Do not refrigerate, as the base needs to be soft when added to the marquise mixture. If you make it the day before, you may need to warm it slightly. Whisk it until it is smooth again before using it in the marquise recipe.
In the bowl of a stand mixer, combine the egg yolks and whole eggs. With your whisk attachment, whip on high speed until very thick and pale, about 10 minutes.
When the eggs are getting close to finishing, make a sugar syrup by combining the sugar and water in a small saucepan. Bring the syrup to a boil and then cook to softball stage (235F/115C). Remove the pan from the heat and immediately drizzle the sugar syrup into the fluffy eggs (while the mixer running on low speed), trying to hit that magic spot between the mixing bowl and the whisk. When all of the syrup has been added (do it fairly quickly), turn the mixer back on high and whip until the bowl is cool to the touch. This will take at least 5 minutes.
In a separate mixing bowl, whip the heavy cream to soft peaks. Set aside.
When the egg mixture has cooled, add the chocolate base to the egg mixture and whisk to combine. Try to get it as consistent as possible without losing all of the air you've whipped into the eggs. Fold 1/3 of the reserved whipped cream into the chocolate mixture to loosen it, and then fold in the remaining whipped cream.
Pour into the prepared liners and freeze until very firm, at least 4 hours (preferably 6 – 8 hours). Remove the pan from the freezer and place in the refrigerator about 15 minutes before cutting. Do not allow marquise to sit out more than 5 minutes before cutting and serving. It melts quickly. If the dessert appears too melted, return the freezer for a few minutes.
Toasted Almonds
1/4 cup (2 oz.) sugar
1/2 teaspoon cinnamon
1/8 teaspoon cayenne
1/4 teaspoon salt
1/2 large egg whites
1/2 cup blanched whole almonds
Preheat the oven to 350F. Line a sheet pan with aluminum foil.
In a small bowl, combine the sugar, cinnamon, cayenne, and salt.
In a larger mixing bowl whisk the egg white until it's frothy and thick. Add the spice mix to the egg white and whisk to combine completely. Add the nuts to the egg white mixture and toss with a spoon.
Spoon the coated nuts onto the parchment paper-lined baking sheet. Bake the nuts for 15-20 minutes, or until they turn light brown.
Allow the nuts to cool completely and they will get very crunchy. Set aside until ready to serve.
Tequila Caramel
1/4 cup (60 ml/2 fluid oz) (2 oz/55 gm) sugar
2 tablespoons (1 fluid oz./ 30 ml.) water
1/4 cup (2 fluid oz./ 60 ml.) heavy cream
1/4 teaspoon salt
1/2 tablespoon tequila
In a heavy-bottomed saucepan, combine the sugar and water on medium-high heat. Boil until the water completely evaporates and the sugar caramelizes to a dark mahogany color. Working quickly, add the cream to the darkened caramel. It will bubble and pop vigorously, so add only as much cream as you can without overflowing the pot. Return the pot to the stove on low heat and whisk gently to break up any hardened sugar. Add any remaining cream and continue stirring. Gradually, the hard sugar will dissolve and the caramel sauce will continue to darken. When the caramel has darkened to the point you want it, remove it from the heat. Add the salt and tequila and stir to combine. Set aside until ready to serve.
2 tablespoons (1 fluid oz./ 30 ml.) water
1/4 cup (2 fluid oz./ 60 ml.) heavy cream
1/4 teaspoon salt
1/2 tablespoon tequila
In a heavy-bottomed saucepan, combine the sugar and water on medium-high heat. Boil until the water completely evaporates and the sugar caramelizes to a dark mahogany color. Working quickly, add the cream to the darkened caramel. It will bubble and pop vigorously, so add only as much cream as you can without overflowing the pot. Return the pot to the stove on low heat and whisk gently to break up any hardened sugar. Add any remaining cream and continue stirring. Gradually, the hard sugar will dissolve and the caramel sauce will continue to darken. When the caramel has darkened to the point you want it, remove it from the heat. Add the salt and tequila and stir to combine. Set aside until ready to serve.
Meringue
3 large egg whites
1/2 cup less 1 tablespoon (105 ml) (3½ oz or 100 gms) sugar
pinch of cream of tartar
1/8 teaspoon vanilla
When you're ready to plate first drizzle the caramel sauce and then place a dollop of meringue onto each plate. Torch the meringue by hand or under a broiler set to 'low'. If using the broiler, watch very closely so you don't end up burning the meringue. Also, do not place Marquise under the broiler, unless you want a puddle of chocolate.
1/2 cup less 1 tablespoon (105 ml) (3½ oz or 100 gms) sugar
pinch of cream of tartar
1/8 teaspoon vanilla
When about ready to serve, make the meringue.
Combine the egg whites, sugar and cream of tartar in the bowl of a stand mixer. Using a whisk to stir continuously, heat the egg whites over a saucepan of simmering water. The egg white mixture is ready when you can no longer feel pieces of sugar between your fingers when tested.
Remove the mixing bowl from the saucepan and return it to the stand mixer fitted with the whisk attachment. Whisk until you reach soft peaks. In the last 10 seconds of mixing, add the vanilla to the meringue and mix thoroughly.
Labels:
Almonds,
Caramel,
Chocolate,
Daring Bakers,
Meringue
Subscribe to:
Posts (Atom)